Preparing the MCDU
This guide will help you prepare the MCDU in the A32NX for your departure. It includes a simple route that you can use to follow along easily and replicate in the simulator.
Disclaimer
The level of detail in this guide is meant to provide a FlyByWire A320neo beginner the ability to adequately program the MCDU to conduct and complete a flight.
A beginner is defined as someone familiar with flying a GA aircraft or different types of airliners. Aviation terminology and know-how is a requirement to fly any airliner even in Microsoft Flight Simulator.
You will find many great videos on YouTube on how to fly the FlyByWire A32NX.
Check out the FlyByWire YouTube Channel as well: FlyByWire on YouTube
The simBrief route used in this guide
Prerequisites
Below are a few Prerequisites before programming the MCDU.
Visit Starting the Aircraft to learn more.
- Make sure the aircraft is powered up.
- External Power OR APU
- Make sure the ADIRS are set to NAV.
- Have a valid flight plan.
- Ensure IFR clearance has been obtained.
Requesting IFR Clearance
Before departing for the flight, we must obtain an IFR clearance from ATC. The clearance may be obtained from clearance delivery or another specific frequency, depending on the airport and available services.
If you are not flying on network and are using the built in ATC menu, simply find the appropriate selection in the menu and request for IFR clearance.
Clearances will usually provide the following information below. As a pilot you would need to read back the clearance correctly or acknowledge it if using the built in ATC menu.
- Cleared to the destination via specified route in the filed flight plan.
- Initial cleared altitude after departure.
- Assigned SID for departure OR radar vectors
- Assigned departing runway.
- Transponder/squawk code.
- Departure frequency.
Additional reading material: The CRAFT mnemonic
Chapters / Phases
This guide will cover the following topics:
Understanding the MCDU
During the course of this guide we will be referring to a few key terms which are defined below.
Line Select Key (LSK)
LSK for short. These keys are on the left and right hand side of the MCDU screen. They are highlighted in the image below.
- Left hand keys are referenced (in descending order) as
LSK1L - LSK6L. - Right hand keys are referenced (in descending order) as
LSK1R - LSK6R.

Slew Keys
These keys are referenced below.
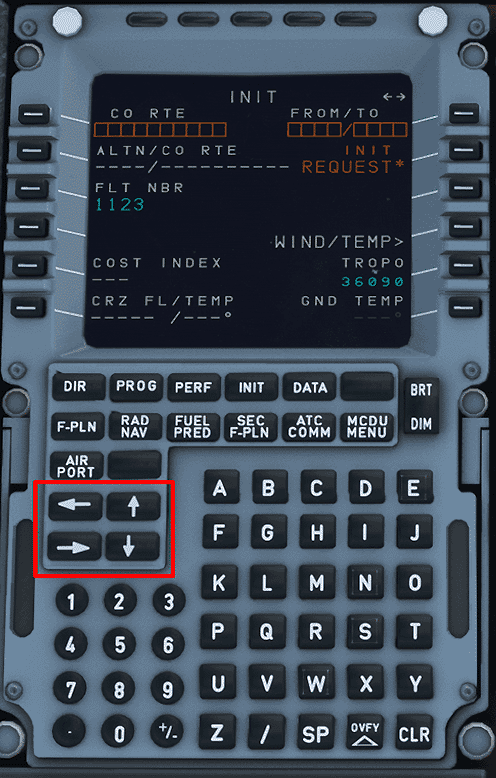
Info
These keys scroll between certain pages i.e. INIT A and INIT B when the INIT page is selected.
These keys scroll vertically on certain pages i.e. F-PLN page.
MCDU Programming
D.I.F.S.R.I.P.
Pilots commonly use the acronym above when programming the MCDU. It represents the following flow on the MCDU:
The simBrief route used in this guide - Available Here
DATA
This MCDU page provides various data for the pilots. It has two pages (accessed by using the horizontal slew keys). It will not be used for this tutorial.
DATA includes the pages below:
- Position Monitor
- IRS Monitor
- GPS Monitor
- A/C Status
- Closest Airports
- Equitime Point
- Waypoints
- NavAids
- Runways
- Routes
INIT A
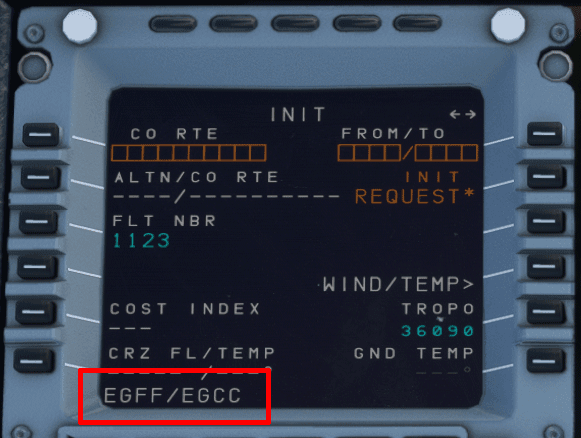
FROM/TO Field
- Using the keypad type in
EGFF/EGCC - Once this is in the scratch pad press LSK1R.
- This following screen would show "company routes". Since there are none stored select
Returnusing LSK6L.
FLT NBR
- Using the keypad type in
EZY123and press LSK3L. Feel free to use your own flight number here! - If you have the Free Text module enabled for your flight, this will enable other users flying the A32NX to send you messages. This will not be covered in this guide.
COST INDEX
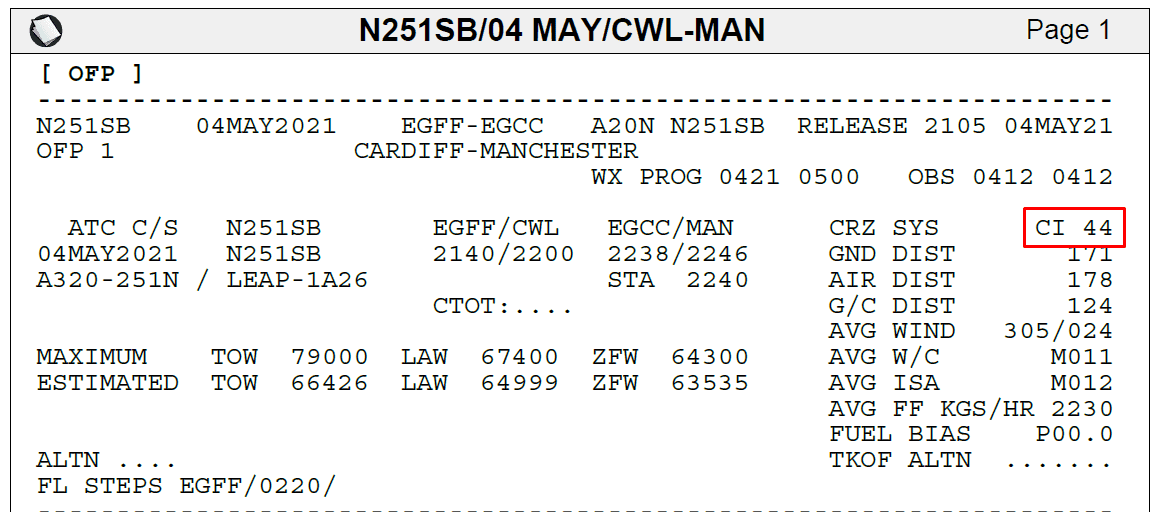
The cost index can be found in the image above.
- Using the keypad type in
44 - Press LSK5L.
CRZ FL/TEMP
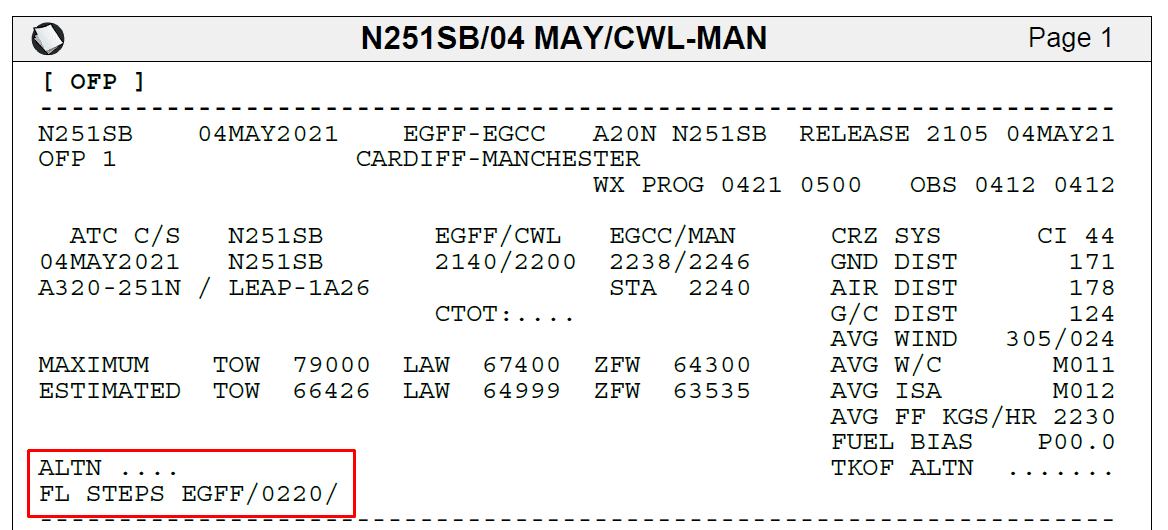
Input the desired cruise flight level in this field. On our OFP this is listed as 0220 or FL220.
- Using the keypad type in
220 - Press LSK6L
This will input FL220 and the temperature as well.
FLIGHT PLAN
Upon loading the flight plan page there will be three entries. Departure airport, (DECEL), and arrival airport.
Our route for this flight can be found on the 2nd page of the OFP
Routing Disclaimer
Note, that waypoints, STARs, and SIDs may be called differently due to different nav-databases or different AIRAC cycles between simBrief and the simulator.

EGFF/30 BCN1A BCN N864 MONTY MIRSI1A EGCC/05R
Inputting a SID
SID
Standard Instrument Departure Route
These are procedures that are defined and published that takes a flight from the take-off phase to the enroute phase.
Also see: SIDS and STARS
To program the Standard Instrument Departure (SID):
- Press LSK1L or EGFF (the departure airport)
- Select
DEPARTUREshown next to LSK1L - Select the runway we are departing from. In this case
30using LSK3L - On the list of SIDs select the
BCN1Adeparture
The MCDU should now show at the top of the screen in yellow what is selected for our departure from EGFF.
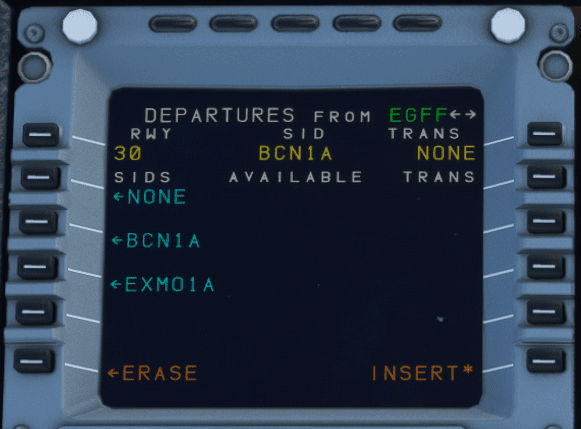
- Press
INSERTusing LSK6R to program this into the flight plan.
Our flight plan should now have the associated waypoints for the BCN1A SID. We can scroll through the flight plan using the vertical slew keys. The SID terminates at BCN and this is where we can begin to fill out the rest of the flight plan.
BCN1A ILS Frequency
When selecting a departure SID that pairs with a LOC/ILS frequency, the respective frequency will be auto-populated in RADNAV provided it is available from the navdata.
Enroute Flight Plan
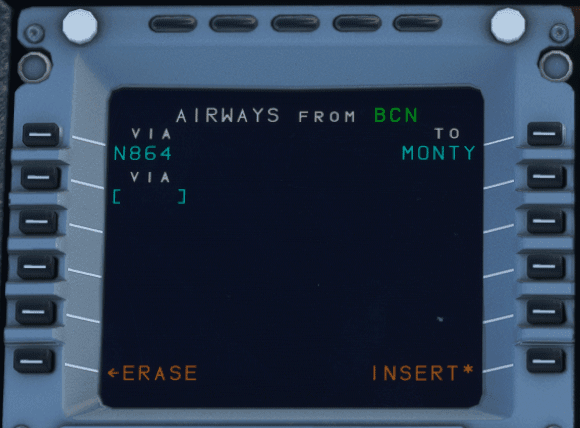
- Press the LSK that matches the location of
BCNon the MCDU screen. - Select
AIRWAYSusing LSK5R. - Using the keypad type in
N864(the airway) and press LSK1L. - Using the keypad type in
MONTY(waypoint) and press LSK1R.- Remember: Airways are on the left and waypoints are on the right.
Planning the Arrival
For the purposes of this guide we will preplan our arrival into EGCC via the MIRSI1A STAR into 05R.
STAR
Standard Terminal Arrival Route
Similar to the SID, these are procedures that are defined and published that takes a flight from the last point in a route (in our case MONTY) to the first point in the approach or the initial approach fix (IAF).
Also see: SIDS and STARS
Find EGCC in green in flight plan OR select EGCC in white under DEST using the corresponding LSK.
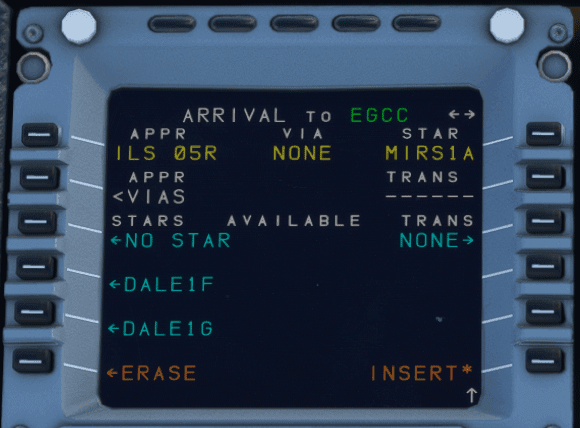
- Select
ARRIVALusing LSK1R- We will be shown the approaches available designated by
TypeRwy. - For this guide we will shoot for an ILS to keep it simple.
- We will be shown the approaches available designated by
- Use the vertical slew keys to find
ILS05Rand select it using the corresponding LSK. - Again use the vertical slew keys to find the STAR for this flight
MIRSI1Aand select it using the corresponding LSK. - We won't have any vias for this flight. Select
NO VIASusing LSK2L. On the following page we can choose transitions if available, but for this flight we don't.- Note: Due to the default MSFS flight plan manager we maybe directed to proceed via the
MCTwaypoint anyways for the arrival.
- Note: Due to the default MSFS flight plan manager we maybe directed to proceed via the
- Insert this STAR into the flight plan using LSK6R.
Verify the flight plan by using the vertical slew keys to scroll through it.
Viewing Flight Plan on ND
We can also verify the route looks correct by selecting Plan on the EFIS control panel and watching the ND as we scroll through.
USR Waypoints
One thing to note are the USR waypoints the sim inputs into the flight plan. These are pseudo waypoints the simulator creates to draw the flight plan.
There is a small bug in the simulator where the USR waypoint on arrival may bug out and proceed direct to runway. Please be aware and use selected HDG to mitigate this issue.
SECONDARY FLIGHT PLAN
This page will allow us to input a secondary flight plan. This page is currently inoperable in the A32NX. We will update this portion of the guide when it is usable.
RAD NAV
On this page, we would set any frequencies or identifiers needed for the departure and subsequently later enroute those required for the arrival.
For the purposes of this guide we will be using frequencies in the RADNAV page.
If we would like to have additional navaids for the departure, we can input the runway localizer for runway centerline guidance on the PFD and the initial procedure turn, including the BRECON VOR (BCN) to verify the track enroute to BCN. This is a little bit more advanced than this guide allows for but we will cover how to input frequencies.
VOR
On this departure we have the BCN VOR with a frequency of 117.45
- Using the keypad type in
117.45and press LSK1L. This will auto populate the identifier of the VOR when within range. - We can also set the desired course to track
031and press LSK2L to input it.
Departure ILS
When selecting the SID earlier in the flight plan section, the A32NX should have auto-populated the ILS/LOC frequency. If it hasn't we can manually insert it for centerline guidance on take off.
Our departure runway is EGFF/30 (runway 30) which has a frequency of 110.7. When inputting a frequency and we are in range of the ILS it will auto populate the indentifier and course. There is no need to fill these fields.
- Using the keypad type in
110.7and press LSK3 to input it.
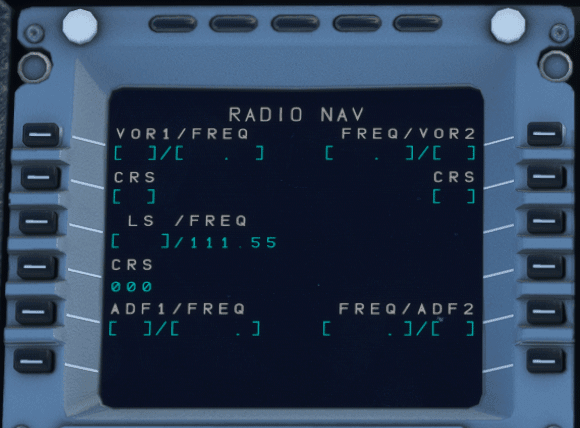
Arrival ILS
With an ILS or LOC approach selected, the arrival ILS frequency should be automatically tuned correctly whenever the aircraft is at climb phase or greater and within 250 NM of destination. Ensure that we verify the ILS frequency when we reach the arrival phase of the flight - see Approach and Landing (ILS).
Remember our arrival airport/rwy is EGCC/05R with ILS05R having a frequency of 111.55. When inputting a frequency and we are in range of the ILS it will auto populate the indentifier and course. There is no need to fill these fields.
- Using the keypad type in
111.55and press LSK3 to input it.
ADF
This works much in the same way as the examples above.
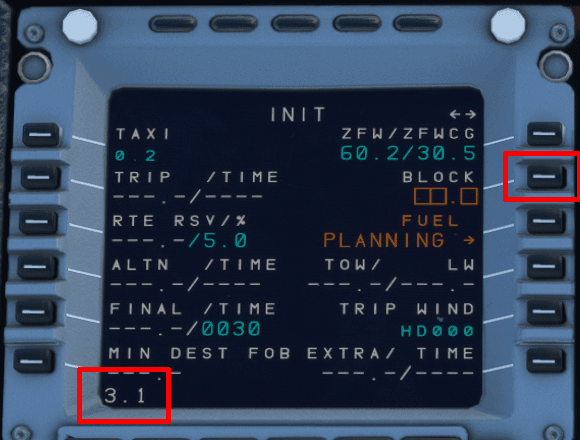
INIT B
To navigate to the INIT B page we first have to select the INIT button. Once on INIT A use the horizontal slew keys to switch the page to INIT B.
On this page, we can input our zero fuel weight (ZFW) and zero fuel weight center of gravity (ZFWCG).
Important Info
Fuel and payload have to be set in the simulator before ZFW/CG for the end result to be correct. (Unless you want to use the default fuel and weight).
NOTE: It is advisable to not use the MSFS Fuel Panel to load fuel or weights.
To learn how see Load Fuel and Payload in the simBrief integration below.
The A32NX can auto populate this information.
- Press LSK1R to load in the calculated ZFW/ZFWCG into the scratch pad at the bottom of the MCDU.
- Press LSK1R a second time to input the above calculation into the MCDU. (The empty orange boxes should now be filled in by the scratch pad entry).
Now we can add our fuel on board (FOB). The amount we input in this field can be done in one of three ways:
- Indicated FOB on the upper ECAM.
- we can have the MCDU plan the amount of fuel required.
- The amount indicated in the OFP.
Loading Fuel
We can load fuel two ways:
- Via the AOC - Learn How
- Via the EFB (not covered in this guide)
ECAM FOB
Look at the upper ECAM and note the FOB indicated. Let's say that amount is 3091 KG. When inputting the block fuel into the MCDU it is referenced in "Tons" and we should round to the closest decimal point.
- Using the keypad type in
3.1and press LSK2R.
MCDU Planning
We can choose to have the MCDU provide a recommended amount of fuel for the planned flight.
- Press LSK3R to compute an amount of fuel.
The Block field will be populated with a calculated fuel amount.
- Press LSK3R again to confirm the fuel.
- We should load this amount of fuel via the EFB or AOC option.
SimBrief OFP
We can use the planned block fuel stated on the OFP which in this case is 3091 KG.
- Using the keypad type in
3.1and press LSK2R - We should load this amount of fuel via the EFB or AOC option.
PERF
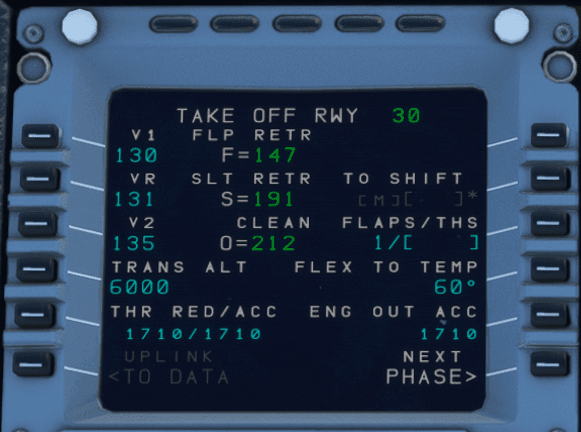
The performance page changes based on the relative stages of flight until we land the aircraft. When programming the MCDU on the ground we start on the take-off performance page.
For this flight we will be taking off with a 1+F flaps configuration.
- Using the keypad type in
1and press LSK3R
Entry of the THS field is subject to airline SOP and may not be required.
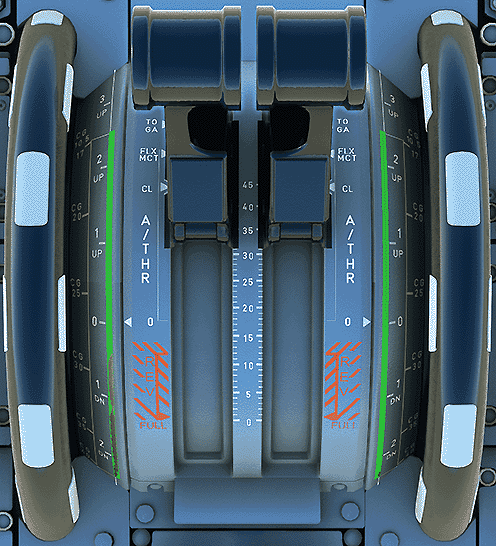
The THS field is where we enter the stabilizer trim for takeoff based on the aircraft's CG. The FUEL PRED page provides an auto-calculated CG of 30.5.
Take a look at your throttle quadrant and look for the CG markings on next to the trim wheel. We need to set a nose down trim of about 0.8.
- Using the keypad type in
/DN0.8and press LSK3R
Other valid entries for THS include:
- With flaps setting example:
1/DN0.8 - Nose up example:
/UP0.5
We can also choose to set a FLEX TO TEMP for the flight. The example we are using today is 60 degrees. (This will normally be calculated via a pilot's company EFB or other tools).
- Using the keypad type in
60and press LSK4R
Our SID chart mentions that the TRANS ALT for this departure is 6000ft.
- Using the keypad type in
6000and press LSK4L
The A32NX can calculate the V-Speeds automatically. To do this simply:
- Press LSK1L to have the calculated V1 speed appear in the scratchpad.

- Press LSK1L again to have 130 inputted into the V1 speed.
- Repeat this procedure for VR and V2.
The performance page should now look like this:
A32NX simBrief Integration
This section has been moved to our dedicated simBrief Integration feature guide.
After setting up the MCDU continue with Engine Start and Taxi